Tuesday, 27 August 2013

Dia De Muertos- Candy Skulls (Inspiration pt 2)

So everyone knows what a candy or sugar skull is, and if they don’t when you show him or her or even your furry little pet a picture they will have seen one before. Candy skulls are at the height of popularity at the moment, they are being used on everything from furniture, to wallpaper and even to body art.

This is good news for me as I absolutely love candy skulls, I’m not sure why I am so attracted to them…I think it’s the edginess of a skull print but with a mix of bright colours and cute patterns which seems to get me every time. So there was no doubt in my mind that when it comes to inspiration for prints I always look to candy skulls and try to use them anyway I can.

So lets start at the beginning what are the origins of the candy skull? This motif comes from the Day of the Dead festival or Dia de Muertos, which is held in Mexico every year.  This festival is all about celebrating with family and friends and remembering loved ones who have passed on. This festival dates back to the Aztec celebrations that would celebrated for an entire month in worship to the goddess known as Lady of the Dead.

So where does candy skulls enter into all of this and how does it fit in with the festival. Well candy skulls entered the celebrations much later and started with candy art, which was introduced by the Italian missionaries in the 17th Century. The Italian missionaries would make candy lambs and angels for the church.

Mexico was of course stockpiled with sugar and it’s production, soon inhabitants learnt that as they couldn’t afford the expensive European decorations they would create their own.  Candy skulls were created from clay molded sugar, they are said to represent a departed soul. The persons name would be written on the forehead of the skull and placed outside the home or on the gravestone to honour the return of a spirit.

As we know candy skull art has grown and reflects a folk art style, normally with smiles, colourful icing and lots of sparkles and glitter (two of my favorite things).

Now I know I have derailed a bit from where the print comes from, but I felt it was important that I shared the history. As mentioned before the market is full of different prints of candy skulls, my favourite is a the Alexander Henry designs  they are always beautiful, quirky and unique…which I love!


Above are some designs that I have found, I can’t take credit for any of them as they are all other people’s fantastic work. It's amazing how this once print can be used in all different formats!

Lots of love,
post signature

Tuesday, 20 August 2013

Adventures at V Festival

Hi all, I am back from the depths of Essex! I spotted lots of interesting prints as well as lots of....interesting fashion choices. One things for certain I did not get the memo that shorts that show your bum cheeks were cool.  Just like shoulder pads, I'm quite sure we will all look back on short shorts and think it was not a good look! These shorts only look good on 6'0 foot model types with shockingly long legs and no cellulite.

Anyway enough about that, I won't bore you with all the details of what I got up to, apart from to tell you that the highlights of the weekend were Ellie Goulding and Kings of Leon. I spotted lots of great festival prints, here are a few examples:


On another subject completely, I wanted to share this awesome dress from ModCloth as the print is so unique...definitely on my wish list

http://www.modcloth.com/shop/dresses/fabulous-flapper-dress

Next week more inspiring fabrics in the way of candy skulls.
Lots of Love,
post signature

Wednesday, 14 August 2013

The wonder that is the Toile De Jouy (Fabric Inspiration 1)

Hello it’s time for my second blog post! Now what can I put in this second post, it has almost as difficult as thinking about a subject for my first post!

I don’t have any creations to unveil yet, so I thought maybe I could share some of the different prints and fabrics I’m using as inspiration and give you a general feel of what LaurenPearl is all about!

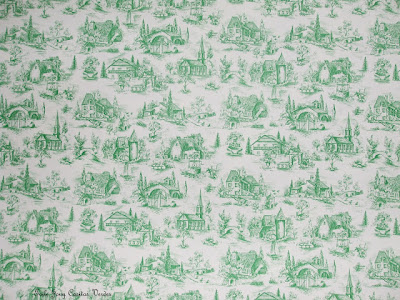
There is no better place to start than the beautiful Toile De Jouy, which is my favourite print at the moment. Normally I wouldn’t go for prints like this, as I like something quirky and bright some might say a bit garish. There is something very classy and all together proper about a good toile.  Now I might hear some of you say...... what is a toile du jouy, but I guarantee you will know the print!

The History of Toile De Jouy


So lets start at the beginning of the toile’s journey, which is around the end of the seventeenth century when Europe finds and takes ownership of a certain print that include bright flowers as well as animal painted toiles, the origin of these toiles were imports from India.

As these designs were so popular and a competitor to factories in France, this caused Louis XIV (14th) to have a bit of a hissy fit and ban nation wide import and production, finally in 1759 he got over it and lifted the ban.

In the mean time Christophe-Phillipe Oberkampf from Wurtemburg saw an opportunity after the ban and opened a factory in Jouy-en-Josas, which specialised in printed cotton.  It soon became one of the most important in Europe.  Oberkampf was inspired by Indian printing techniques, that he used at Jouy and was able to obtain solid colour by the application of mordants (dyes) in the form of metallic salts onto the material, this was then developed by dipping in a vat of madder roots (a type of dye). The mordants use three different techniques Wood, copper plate and copper roller.

In the first ten years the factory created polychrome, wood block prints in a floral and botanical design this was mainly used for clothing (society ladies dresses!) In 1770, monochrome copper plate prints were used and allowed the fabric to be put on furniture.  Later in 1797 copper rollers were introduced and a new style was created which allowed geometric forms that were mixed with antiquity and mythological creatures.

Toile De Jouy today


With more that 30,00 original Toile De  Jouy designs, it is going to be hard finding an original design to adapt to this style.

Printing methods have most definitely evolved and gone are the days of wood block printing. We are now more likely to see a Toile hand painted or screen printed. The fabric also no longer needs to be created in Jouy-en-Josas to be called Toile De Jouy, we now recognise this print as designs that depict country scenes and are normally in black, purple, red or the most popular blue.

There is even a museum that can be visited that will tell you all about the history of this wonderful fabric and technique.

Below are some examples of fabric I have been looking at, I would just like to stress that none of the below are my designs and have been taken from different sites all over the web.


I’m off to V festival over the weekend, so I hope to report to you on lots of lovely festival inspired fabric.

Lots of love,


post signature

Thursday, 8 August 2013

Textile Design Workshop at the London College of Fashion 29th July-2nd August 2013

So I've been thinking about creating a blog for a long time, but I didn't really know where to start or what my first entry should be? With my ever growing thoughts of wanting to do textile design and creating my own scarf line, I took myself off to London College of Fashion to take a course in textile design....with this in mind I thought an account of my time with some pictures of my work, what better way to getting my blog kicked off!

Day One

I travelled to London to take part in the course and as I'm not a local travelling to Limegrove was a bit of a novelty, I managed to arrive on my first day at 9.25 for a 10.00am course! Oh well it's good to be early and have a sometime to prepare myself. At 10.00am we met our tutor Dominique L'Olive, who would fast become our oracle of all things textile (even referring to Dominique as Mr Miyagi).


Our first task was using the heat transfer press, we sketched some ideas as well as using various items from a magic box of tricks that was full of different items such as cotton reels, lace and different trim. I found an amazing piece of lace that I kept the whole week to use in my designs.The idea is the heat from the press will transfer the ink designs to the fabric pressed underneath. I tried and tested lots of different ideas, getting lots of funky results. I also Found out that should I want to do this from home all I would need is a dry iron.


Day Two

Day two was all about the stencilling and open screen printing, we started by designing basic stencils that would need to be cut out with a scalpel and cutting board. I'll be honest at first I found it really difficult cutting out the shapes, I kept tearing the paper, as it was so thin! Using the scalpel just didn't come naturally to me; I guess it is probably something to do with fact I hold my fork and knife the wrong way around!! This was the day, I decided I wanted to stencil a candy skull, with all the day of the dead trimmings. My only problem with this design was I just couldn't get the idea in my head and how I was going to stencil the layers! I gave up on this idea for the day, deciding on something a bit easier.


Day Three

We did more stenciling and printing using the screens, this time I started printing on my t-shirt. I obviously needed the night to think over my day of the dead skull because I came into college as fresh as a daisy knowing exactly what I needed to do. I also used this time to finish some of my designs and added more layers. As well as printing we had a go at wax painting and dying the fabric. I didn't find this as interesting as the other methods we tried.


Day four

After my test candy skull it was time to have a go printing my t-shirt, On day three I also took the opportunity to visit poundland where I found all sorts of goodies that could be used to print onto the material and create really cool effects. My classmates had also brought in lots of fun bits and pieces that would be interesting on the heat press. Today as well as finishing some pieces we learnt about shibori, the art of sewing shapes into the fabric to create resist prints. We also learnt about pleating fabric as well as painting a block of colour on paper and using lacy fabric and other items to create resists.  I managed to create a skull shaped stencil on previous days and kept to this theme throughout my designs. The lovely Melissa one of my classmates brought in this super cool spider lace, which worked amazingly on my skull design. I also found a really cool method of peeling the Velcro from rollers and using the inside to make a cool print pattern. As you can see I also got a bit too obsessed with the violet ink. 


Day Five

The last day at the London College of Fashion! It had gone by so fast I had lots of ideas and Dominique had given me lots to think about in terms of starting up my label.  I had promised myself that once the course was over I would really get things in order and start being serious about doing my textile design. Today we were introduced to a really quirky method called foiling, which for someone like me with a penchant for bright colours it really appealed to!  We also had the chance to use some templates with our material, which really gave us the chance to put our designs in context.


I had a great time studying textile design and trying different methods and as I said before I came away with lots to think about and hopefully I can make success at this.  I met lots of lovely people who I hope to stay in contact with and exchange tips and advice with in the future.

Thanks for reading, how was that for a first post? I would be interested to hear from anyone that happens to stumble upon this blog and gives it a whirl.


post signature